
I am doing this blog for all the people who wanted to know how I did those professional looking portraits I posted on Facebook. Like I promised, it's very simple and at the end you will find me not so talented after all, but it's ok because even I learned it within ten minutes of chat with the founder of VAST Yangtse, Mr Jimmey Dorji. It take a little bit of curiosity with more than average passion for art to do it.
Step 1. Look for a good quality picture of the subject you want to work on, most probably yourself or your favourite person to begin with. I have chosen His Majesty's picture to demonstrate because I know you will try doing His portrait at one point.
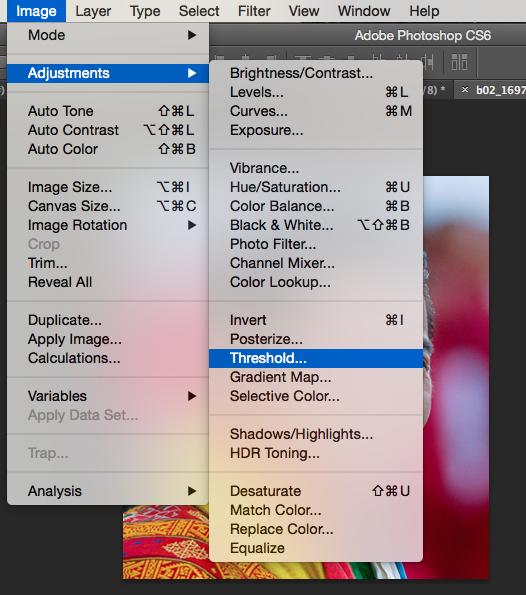
When using any picture editing software (Paint, Publisher, Photoshop, etc.) convert it into Black and White picture (completely). If you have Photoshop then follow the procedure shown in the picture (Image> Adjustment>Threshold)
The following is the result. Make sure Black parts are well defined. Don't make it too black to too white, maintain the integrity of the picture- it has to look like His Majesty even with just simple Black and White patches.

Step 2. Print out the edited picture. Bingo, we are done! Well not that fast. Choose a good paper if you have. Transparency sheet is best if you want to reproduce the art over and over but otherwise just ordinary paper is ok.

Step 3. Using a blade or cutter knife cut out the black portions carefully. The finer you cutting the better the result.

This is how a finished stencil looks like. Mine is not so well done because I had to rush to finish this blog.

Step 4. Place the stencil on the canvas or wall or shirt or wherever you want to do the portrait and paste it using a tape. Make sure there is no fold on the stencil.
It's time to choose colour, the best is black. Acrylic paints dry instantly therefore get a small bottle of Black Acrylic to avoid spillovers. Then you need a sponge to apply the colour. But since I don't have a sponge I am going to use brush.
Now soak the sponge or brush in the colour and carefully apply all over the opening in the stencil, making sure that the colour is evenly spread all over. Pay special attentions to small corners like eyes and lips.

Step 5. Let it dry for a while. If you have used Acrylic then no worries, but if you have used water colour or oil colour then remove the stencil carefully and there you are... Just waiting to be signed! T

The stencil can be used again and again and again until it tears off. If you have used transparency sheet then there is no question! All the best! If you are doing one right away, give me the honour of looking at your finished work!
Nice and creative as always. Thanks for the lucid explanations and directions.
ReplyDeletewow!!! So nice sir. Wanna try it too! :)
ReplyDeleteI am excited to try put as well!!! Thank you for sharing sir!!
ReplyDelete